
45 cm x 35 cm; 2015
Blog Post 10


45 cm x 35 cm; 2015
Blog Post 10

45.5 cm x 38.5 cm; watercolour on rice paper; 2015
Blog Post 9
Here’s the flower to paint during the Christmas season–Poinsettias. Paint them on thick rice paper and then print them as Christmas cards for your relatives and friends.
The sequence of painting a flowering branch of Poinsettias is as follows: center (small flowers); first layer of bracts (innermost); second layer of bracts; third layer of bracts; stem; leaves (young and old); black mosses on the old woody stems; and weeds. If you want, you can also add butterflies or bees as ‘leads’ to your focal flower.
As I painted Poinsettias, here are some things I learned which you can share with others, too:
-To paint the flowers:
-To paint the stems:
-To paint the leaves (mature and young):
-Add-ons:
So there, all the things I learned to make showy Poinsettias for your big paintings or Christmas cards. Just contact me if you want further instructions.


38.5 cm x 45.5 cm; watercolour on rice paper; 2016
Blog Post 8
Peony Diveristy and Pink Peonies explode in cheerful colours, don’t they? Oh, wow–I imagine them printed on my silk scarves!
Have you tried painting the Pink Peonies? If so, then free style painting these multicoloured peonies will just be a wee bit different. See the more detailed tips on painting peonies in Pink Peonies below this entry.
Use as many colours as you wish. Here, aside from poster white and flower red, bring out also the following colours: rattan yellow, vermillion, carmine, and stone blue. Mix those colours in different proportions and you can paint countless hues of peonies.
To paint a similar composition as in Peony Diversity, load a large white brush with:
Let your imagination run free for painting a garden of multicoloured peonies. If you wish, you can even include various shades of blue peonies.
Here’s another challenge: Paint your multicoloured peonies with a vase, a la Van Gogh. Here’s one I did, Radiant Peonies:

Keep painting. Imagine, plan, realise your imagination on rice paper, and be happy!
![]()

38.5 cm x 45.5 cm; watercolour on rice paper, 2016
Blog Post 7
“Roses as big as cabbages!” was how Marco Polo described peonies when he first saw them. Indeed, peonies are very colourful and attractive as their large flowers burst in all colours except blue. They are found in Asia, Southern Europe, and Western and North America.
Peony is the national flower of the People’s Republic of China. It is a symbol of spring, beauty, wealth, luck, and happiness. Thus, for all the wonderful things that peonies symbolise, they have become one of the classic subjects of Chinese brush painters. And of course, when you receive a peony painting, you become a very lucky person.
Nowadays, peonies are the accent flower in bridal bouquets and the traditional flower for celebrating the 12th wedding anniversary.
For me, the best way to honour the beauty of peonies is to paint them. Here are some tips to set you on your way of doing so, too.
To paint the fully opened flower:
To paint the half-opened flower:
To paint the bud:
To paint the flower stems:
To paint the old branches:
To paint the leaves:
Enjoy painting the pink peonies and then try painting the multicoloured ones, too. Nothing beats the joy of having painted the beautiful peonies!
![]()

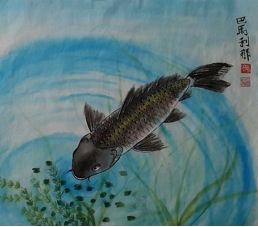
38.5 cm x 45.5 cm; watercolour on rice paper, 2015
Blog Post 6
Before I tried to paint carps, I spent long hours observing how they moved– swimming and feeding in so many ponds, videos, photos, paintings, figurines, and carvings. So far, I’ve only done three carp paintings. My first was a lone, black carp and it was swimming alone. That’s why I named it Darthus Vaderus. My second carp painting, a colourful one, is shown above–the contentedly feeding Three Lucky Carps. Then, for my third carp painting, I painted a group of nine feeding carps–Fullness. Really, it takes a lot of time and patience to finish a painting composition about carps. So, I got lost in painting my favourite flowers and birds again. But, I’m sure I’ll challenge myself again and paint more carps.
Here are some general tips on how I painted the Three Lucky Carps:
To colour the first carp:
To colour the second carp:
To colour the third carp:
To colour the fins:
To wash the light flower-blue water ripples:
To paint the duckweeds:
Oh, before I end this post, let me show you my first carp–Darthus Vaderus:
For me, painting carps poses a different kind of painting challenge, a different kind of ‘high’. That’s why before this year is over, I’m sure I’ll paint more carps. It’s sheer joyto paint such beautiful creatures and give them as Christmas gifts to friends–with bragging rights, of course.
![]()

11.5 cm x 15.5 cm; watercolour on rice paper; 2016
Blog Post 5
I’ve been mesmerized by this typical garden scene many times over: bees hovering over beautiful flowers. Here, I’ve frozen the interaction of brighly-colored Dahlias and honey bees. It’s a classic reminder that God’s creatures should live in give-and-take, peaceful relationships.
I painted Dahlias with lined petals and unlined or freestyle buds, sepals, branches, and leaves. It’s a joy to paint Dahlias because they are large flowers which come in many colours–vermillion, red, pink, purple, white, or in-between shades of these colours. There are even varieties which are multi-coloured in one flower; e. g.: yellow centre petals, and then yellow, white, and carmine outer petals. Use a thick mix of white poster on brown rice paper if you will paint white Dahlias.
Here’s the sequence I followed in painting My Bee-utiful Friends: flowers; buds (tightly closed, slightly opened; and half-opened); sepals; branches; leaves; and bees. I hope the following tips can somehow guide your composition about Dahlias:
Tips for painting the flowers:
Tips for painting the buds:
Tips for painting the sepals:
Tips for painting the branches:
Tips for painting the leaves:
Tips for painting the bees:
Tips for painting the grasses:
Blog about your composition about Dahlias, too. It’s a great pleasure to learn from each other’s painting techniques.


42 cm x 30 cm; watercolour on brown rice paper; 2016
Blog Post 4
Yes, the chicks are awed by the silver Wisteria. Who wouldn’t be?
I used brown paper so the silver sheen of the flower petals can be seen. Actually, the flowers have two layers of watercolour paint: the first layer was a combination of green and white; and the second layer was poster silver. I also painted a bit of the landscape where the awed chicks view the silver Wisteria flowers.
I painted this composition in the following sequence: leaves, flowers, more leaves, vines, chicks, and landscape. I’m sharing the following tips so you can paint the essence of the silver Wisteria and the awed chicks.
To paint the bunches of Wisteria flowers:
To paint the leaves:
To paint the chicks in 3 positions:
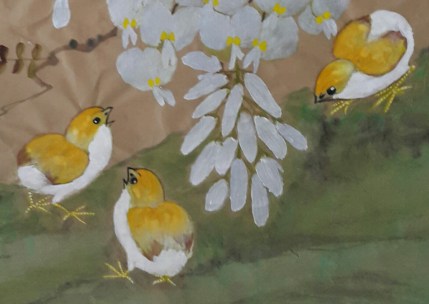
To paint the vines:
To paint the landscape:
![]()
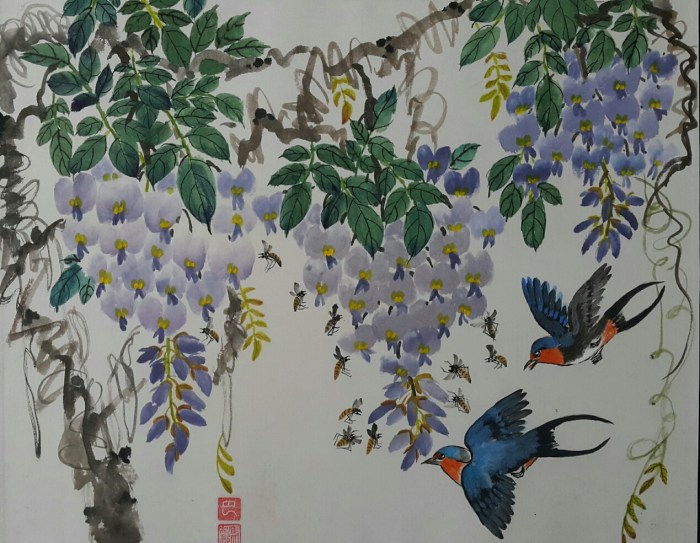
38.5 cm x 47 cm; watercolour on cotton rice paper; 2016
Blog Post 3
Here’s one of my paintings of the Chinese Wisteria–the most floriferous and fragrant of all varieties of Wisteria. In this composition, I painted its flower-laden vines being visited by its best friends, the birds and the bees. Imagine–it must be a Fragrant Refuge.
This was my sequence of painting this beautiful woody vine: bunches of flowers with terminal buds; old and young vines; old and young leaves, stamens and pistil (represented by dots) below the petals; and then lastly, the swallows and the honey bees.
Here are some basic techniques to paint the flowers:
To paint the Wisteria leaf, I observed my vigorously growing 2.5-month-old Wisteria given by Prof Lim. Look. It has many opposite leaflets per leaf. But, it is acceptable to represent its essence by painting just 5 or 7 leaflets per leaf.

Here are more tips on how to paint the Wisteria leaf:
To paint delicate terminal buds:
To paint the vines:
To paint the flying swallows, showing its back and side views:

To paint bees:

There–that’s a sample of a painting composition with three interacting figures: a woody and floriferous vine; a pair of flying swallows, and a group of hovering bees. Indeed, this is a difficult composition because of the details to be done. But–it can teach you a lot of painting skills which you need in your future paintings. But then, is it a difficult task which is uncalled for? From my point of view: Definitely, not so. Let me remind you of one of the truisms which serve as guideposts of the art of Chinese brush painting:
“If you aim to dispense with method, learn method; if you aim at facility, work hard; if you aim for simplicity, master complexity.”–Lu Ch’ai (Wang Kai), Master of Ch’ing Tsai T’ang, XVII Century.
![]()
30 cm x 42 cm; watercolour on cotton rice paper; 2016
Blog Post 2
Did you notice that the Chinese Ground Orchids (Bletilla striata) represent a mother (left) and its daughter? Look how lovingly its whole body bends and reaches for its look-alike daughter. I painted it for Mother’s Day of all Species which was celebrated worldwide on May 8, 2016. Then, I sent it to all my friends who are outstanding mothers I know.
Just ‘Google’ the common or the scientific name of the Chinese Ground Orchid and you will know so many things about it. In Chinese culture, it represents perfection, elegance, integrity, nobility, and friendship–that’s why it is the best image to represent our loving mothers.
Paint the leaves first, then the flower stalk, followed by the flowers. Here are some tips on how I painted the leaves:

Here are some tips on how I painted the flowers:

The Chinese Ground Orchid is one of the Four Gentlemen, representing spring. The other three are Plum Blossom for winter; Bamboo for summer; and Chrysanthemum for autumn. I still keep my first set of paintings on the Chinese Ground Orchid. They serve as my 2013 painting benchmark–reminders of how far I have gone and how much more I have to learn.
It may seem so easy to paint the Chinese Ground Orchid but definitely, the exact opposite is true. In fact, I wasted a lot of rice paper and ink before I was able to paint one which could pass as a beginner’s painting. But, in patiently practicing how to paint the orchid leaves and flowers, I learned how to control my brush–its stroke techniques, water and ink loads, and varied pressures on rice paper. Indeed, there are so much more to learn about the orchid’s elegant leaves and flowers.
Would you like to paint the Chinese Ground Orchid too? When Yoda poses a challenge, he says: “There is no try. Just do it!”


