
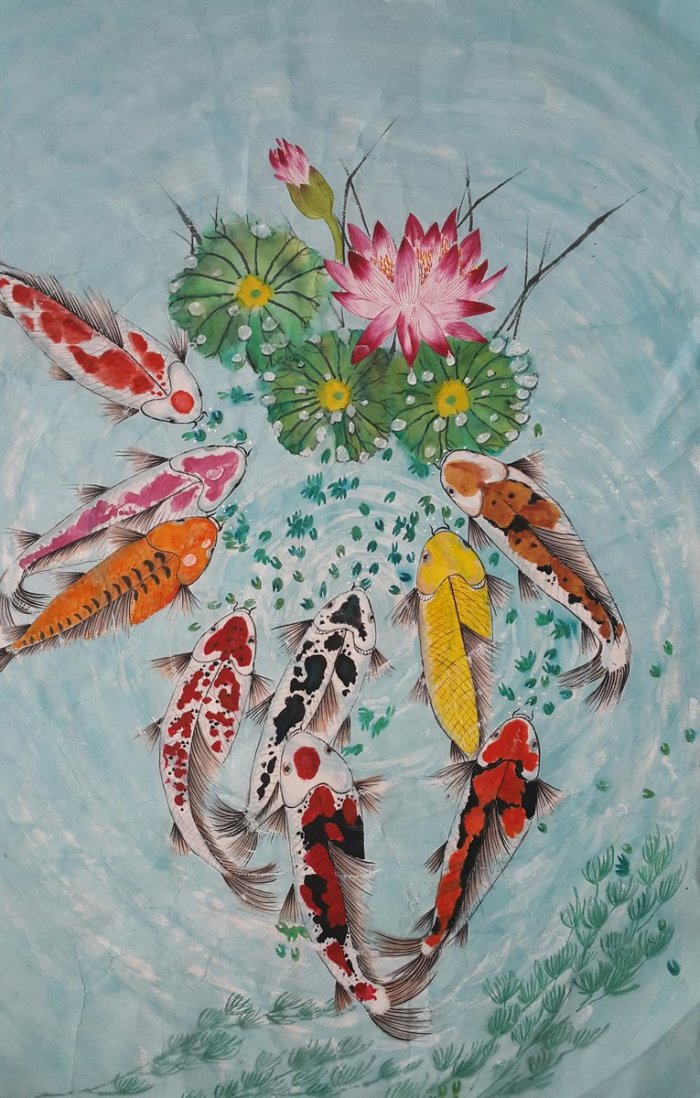
39 cm x 25 cm; watercolour on Korean rice paper
Blog Post 16
This is my fourth koi (carp) painting and I did it for a friend. The first two are shown in Blog Post 6 (Darthus Vaderus and Three Lucky Carps); and the third is shown in Blog Post 14 (Fullness.) In Chinese culture, if 8 kois mean abundance, 9 kois mean fullness. Other symbolisms which kois stand for in Chinese and Japanese cultures are harmony and happiness. And that’s the reason why koi figurines and paintings are welcome add-ons in any household decoration.
By the way, here’s the oldest Chinese legend about the koi: When Confucius had a son in 533 B.C., King Shoko of Ro gave him a gift– a magoy (black koi). And hence, that fertile magoy became the ancestor of all brightly-colored modern kois.
Another interesting legend says that during ancient times, the Chinese carefully raised kois in their rice fields not as pets, but as an important food source for the harsh winter months. Later, the Chinese passed on to the Japanese the practice of raising koi in rice fields.
For this painting, I used brilliant Sakura watercolours on thick Korean rice paper to hold the colours of two washings. Here’s the sequence I followed in painting Luck for All: kois, water lily, first wash, water weeds, and second wash.
Notice the elements of this painting–kois of different colours, water lily (flower, bud, and leaves), water ripples, water grasses, duckweeds, and Cabomba sprigs (the weeds at the foreground). So let me share with you some tips on how I painted each element.
-To paint the carps:
- Use a thin dry brush to outline the placement of 9 kois. Paint overlapping kois as they swim from all directions, and toward their rich feeding area.
- Define the head with light ink–eyes and eyelids, mouth and whiskers, and gills (sometimes shown, if taking in air). Be definite about your point of view to show (or not show) the head features. Dry. Then use light flower blue or gray to shade the edges of the head and make it rounded or 3D.
- Define the body with light ink–fins (gill, back, belly, and tail) and diamond scales. Be definite about your point of view to show (or not show) the body features. Dry. Then, use light flower blue or grey to shade the edges of the head and make it rounded or 3D. Add a tiny white dot on each eye to make them sparkle.
- Use a large brush to colour the kois. Decide on the body designs. You can have ideas on koi colours from books and magazines about koi breeding or from images posted in the Internet.
- Load a large soft brush with light umber to colour the fins and tails. When still damp, add dark ink to define some fin rays. To add shine, add poster white colour on some fin rays.
-To paint the water lily:
- Use a thin, dry brush to outline the lily leaves.
- Load a large white brush with green and then dip its tip into flower blue. Color the lily pads.
- When still damp, do the following: (1) load a thin stiff brush with dark ink to paint the leaf veins; (2) load a medium white brush with yellow green and then dip its tip into rattan yellow; (3) dab the centres of the lily pads.
- When the yellow green centre of the lily pads are still damp, paint a dark green dot at each centre of the lily pads. Dry before painting the water droplets.
-To make the washes:
- First wash: Load a white soft brush with white poster colour to paint the water ripples. Some of the ripples should be painted over the kois to make them appear underwater. Be sure some of the body parts are not painted with ripples to make them rise above the water as they reach for water weeds.
- Second wash: Load a white soft brush with light flower blue and paint around the painted figures (kois and water lily).
-To paint a water droplet:
- Load a medium white brush with a thin mixture of white poster colour. Paint small oval or round water drop on a leaf.
- Use grey to paint a shadow below the water drop.
- Load a medium white brush with a thick mixture of white poster colour and define the lower part of the water drop.
- Use a thin stiff brush and paint a dot at the upper part of water drop.
- Paint more water drops
-To paint water grass:
- Use a medium bamboo brush and have a dry dark ink to paint each blade of water grass coming out of the water surface.
- Paint thin and criss-crossed grass blades.
-To paint duckweeds:
- Load a medium white brush with dark green and then dip its tip into flower blue.
- Duckweeds are heart-shaped.
- Darker colours should be seen at its two lower tips.
- When still damp, dot each centre with dark ink.
-To paint Cabomba:
- Load a medium white brush with flower blue to paint the leaves of Cabomba.
- See to it that the soft twigs are painted along the direction of the ripples.
- When dry, you can paint emerald leaves over the flower blue ones.

Wow! Congratulations Marina! Sold painting…..professional artist ka na talaga!
LikeLike
Thanks, Beth! But I’m into ‘soft selling’ only, not ‘hard selling’; i. e., if somebody likes to buy my painting, ok, I’ll sell so I can buy more painting materials. On the other hand, if no one likes t buy any of my paintings, that’s perfectly ok too; I just keep them as my personal collection.
Btw, may I remind you to scan each of your paintings (at least 300 dpi) so later, you can have them printed into notecards, postcards, gift tags, calendars. Those products are lovely giveaways during Christmas, New Year or any special event in your family.
LikeLike