
17 cm x 20 cm; watercolour on watercolour paper
Blog Post 19
![]()

17 cm x 20 cm; watercolour on watercolour paper
Blog Post 19
![]()

17 cm x 20 cm; watercolour on watercolour paper
Blog Post 18
See also my earlier Wisteria paintings: Blog Post 3 Fragrant Refuge and Blog Post 4 Awed. I painted Wisteria Glow and printed it as greeting cards, postcards, and gift tags for a fund-raising project for street children last December 2016.

30 cm x 42 cm; watercolour on rice paper
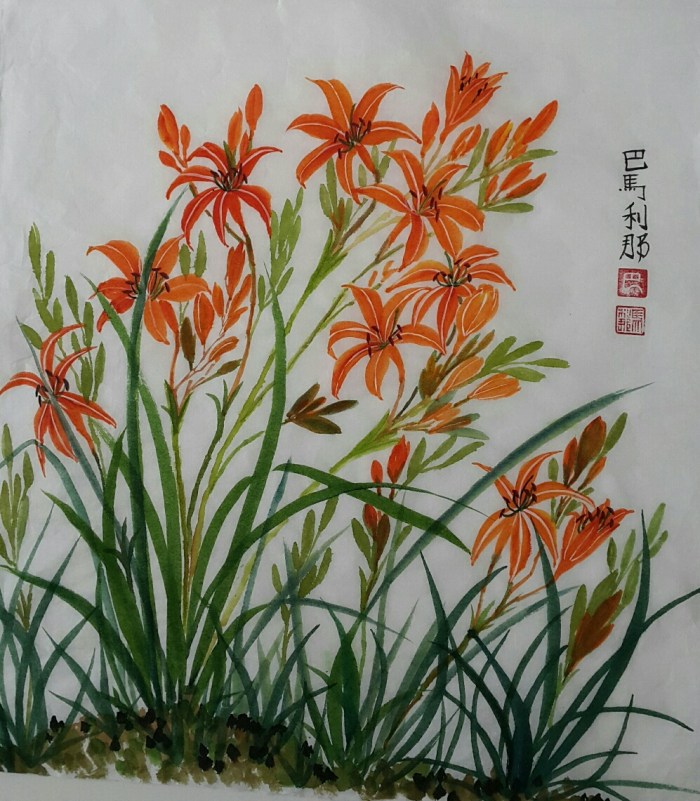
Blog Post 17
The tawny day lilies–the traditional flower for Mother’s Day–do not belong to the Liliaceae family (the true lilies) but they do look like one. Once planted, day lilies need little care, as they just keep on growing new shoots which produce floriferous flower stalks. They are a sight to behold in any garden–sprawling green clumps with brightly-colored, large flowers. Although a day lily flower lasts only for a day, it gets replaced by another one right next day. That’s why they are one of the most favourite garden plants of horticulturists and garden enthusiasts.
39 cm x 25 cm; watercolour on Korean rice paper
Blog Post 16
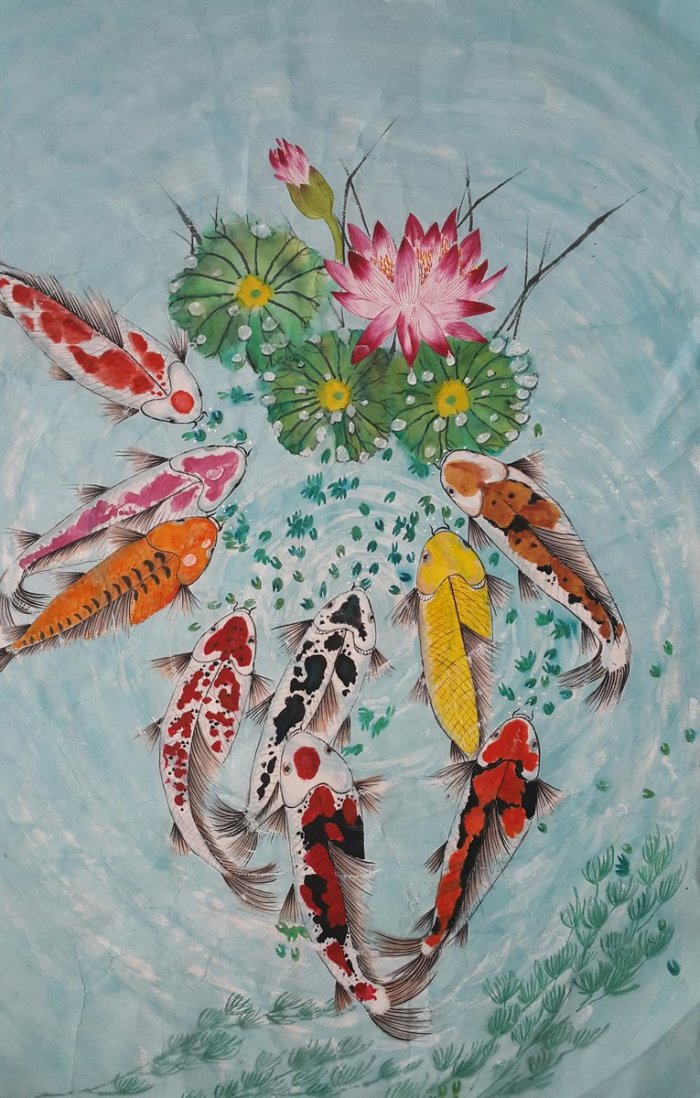
This is my fourth koi (carp) painting and I did it for a friend. The first two are shown in Blog Post 6 (Darthus Vaderus and Three Lucky Carps); and the third is shown in Blog Post 14 (Fullness.) In Chinese culture, if 8 kois mean abundance, 9 kois mean fullness. Other symbolisms which kois stand for in Chinese and Japanese cultures are harmony and happiness. And that’s the reason why koi figurines and paintings are welcome add-ons in any household decoration.
By the way, here’s the oldest Chinese legend about the koi: When Confucius had a son in 533 B.C., King Shoko of Ro gave him a gift– a magoy (black koi). And hence, that fertile magoy became the ancestor of all brightly-colored modern kois.
Another interesting legend says that during ancient times, the Chinese carefully raised kois in their rice fields not as pets, but as an important food source for the harsh winter months. Later, the Chinese passed on to the Japanese the practice of raising koi in rice fields.
For this painting, I used brilliant Sakura watercolours on thick Korean rice paper to hold the colours of two washings. Here’s the sequence I followed in painting Luck for All: kois, water lily, first wash, water weeds, and second wash.
Notice the elements of this painting–kois of different colours, water lily (flower, bud, and leaves), water ripples, water grasses, duckweeds, and Cabomba sprigs (the weeds at the foreground). So let me share with you some tips on how I painted each element.
-To paint the carps:
-To paint the water lily:
-To make the washes:
-To paint a water droplet:
-To paint water grass:
-To paint duckweeds:
-To paint Cabomba:
20 cm x 15.5 cm; watercolor on water-colour paper (140 lb; A5)
Blog Post 15
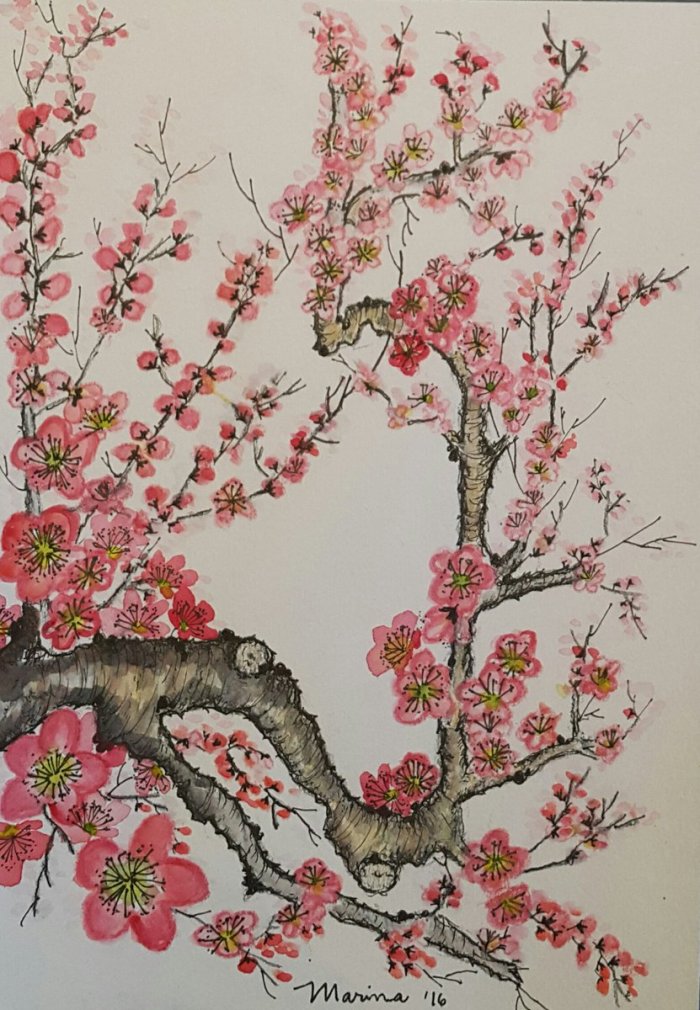
I painted Plum Blossoms on my way to Rome, Italy in October 2016–while waiting for boarding time in two airports and while aboard two airplanes. This is my only plum blossom painting done with a Kuretake transparent watercolour set; i. e., the usual watercolour tin packet containing 14 colours, a 0.3 technical pen and a medium-size water brush. It’s so compact, measuring only 16 cm x 17 cm–so perfect for travelers.
I entertain myself and lose track of time whenever I paint plum blossoms. Most often, I keep imagining its bunches of flowers and buds. Then, I keep extending branches to all directions– just to paint more flowers and buds!
I still remember: I missed my first chance to see plum blossoms in Washington, USA in 1970. But–45 years later, on September 2015, I was lucky to see thick plum blooms during a spring New Zealand vacation with my family.
By the way, before I saw plum blossoms up-close, I have already memorised how to paint them. Reason: Painting plum blossom was a required painting subject in a basic Chinese brush painting workshop which I joined on January 2013. In fact, the entire 10-Saturday workshop (at 3 hours/session) was about the Four Gentlemen (i. e., plum blossom, Chinese orchid, chrysanthemum, and bamboo). So roughly, about 2-3 Saturdays (or at least 6-7 hours) were focused on each gentleman. My discovery then: The easiest brush strokes to learn were those for painting plum blossoms. And the most difficult brush strokes to learn? Those for painting bamboos! And that’s the background story why painting plum blossoms has been my favourite pastime.
Have you painted plum blossoms? Here’s the classic sequence of painting a flowering branch: big branches (in stag horn pattern); flowers (facing all directions, lined or unlined); buds; and sepals of buds, half-opened flowers, or fully-flowers facing directions which show their undersides.
After you’ve finished painting your flowering branch of plum blossoms, you can paint a couple of snuggling birds perched on one of the plum branches They can enhance the loveliness of thick plum blossoms.
Here are some things I learned in painting plum blossoms which you can share with others, too.
-To paint the branches:
-To paint the flowers:
-To paint the buds:
-Add-on birds:
Other plum blossoms I painted using traditional Chinese painting materials (i. e., Taiwan solid watercolours, animal hair brushes, and Taiwan rice paper) are shown below:


Pink Burst Bathed in Silvery Moon


Plums Promises-1 Cold Blooms
At this point, after having shared a long list of tips with you, have I encouraged you enough to prepare your brushes, paints, and watercolour paper for painting thick plum blossoms? All set? Paint and be surprised at what you can do.
![]()

68.5 cm x 44.5 cm; watercolour on rice paper; 2015
Blog Post 14
Even during ancient times, the carp is probably the most popular fish in China. It is closely associated to the dragon. In Chinese folklore, if a carp can jump and cross over the Dragon Gate, it transforms into a dragon. Indeed, the carp is a tough freshwater fish that can resist big currents in China’s ancient Yellow River. Hence, until now, carps symbolise perseverance and determination. Most often, carps are associated with scholastic success and literary luck. But, they are also symbols of happy outcome, joyful marriage, sufficient fortune, and more than prosperity–fullness.
I painted Fullness after I did Three Lucky Carps. See my Blog Post 6. This painting, plus 5 more of my paintings (featured in Blog Posts 13- 9), were selected from my collection by Prof Arsenia Lim for inclusion in the 10th Founding Anniversary of the Philippine Zi-Der Chinese Art Club. This exhibit of 28 participants will be from October 16-19, 2016, 9-5 p.m., at the Federation of Filipino-Chinese Chambers of Commerce & Industry, Inc, 1st Floor, Grand Hall, Federation Center, Muelle de Binondo St, Binondo, Manila.
Main attraction of the exhibit will be the paintings of Prof Arsenia Lim (Tsai Shiu-Yuin), Mentor of the Zi-Der Chinese Art Club and Professor of Chinese brush painting workshops held at the RCBC Museum, Makati.


42 cm x 30 cm; watercolour on rice paper; 2015
Blog Post 13
Morning glories have been a part of my childhood years in Manila. I still remember: Thick, flowering morning glories just grew wild on vacant lots, intertwined with other grasses, weeds, shrubs and even trees. My playmates and I pulled blue and white morning glory vines, wove them, and proudly wore them as crowns, necklaces, bracelets, and rings until they wilt. Nowadays, I don’t see thick, morning glory vines growing wild on grassy areas because there are no more vacant lots in Manila. But I’m glad that their species have been conserved by horticulturists. They are now planted as cultivated garden plants, and their seeds are sold in packets in garden shops and grocery stores.


34 cm x 44.5 cm; watercolour on rice paper; 2014
Blog Post 12


40 cm x 30 cm; watercolour on rice paper; 2015
Blog Post 11

